What this feature does #
The Settings Panel helps you manage how your CTI system behaves during calls.
You can enable auto-answering, control call forwarding, set your offline number, and customize your panel and notification preferences — all in one place.
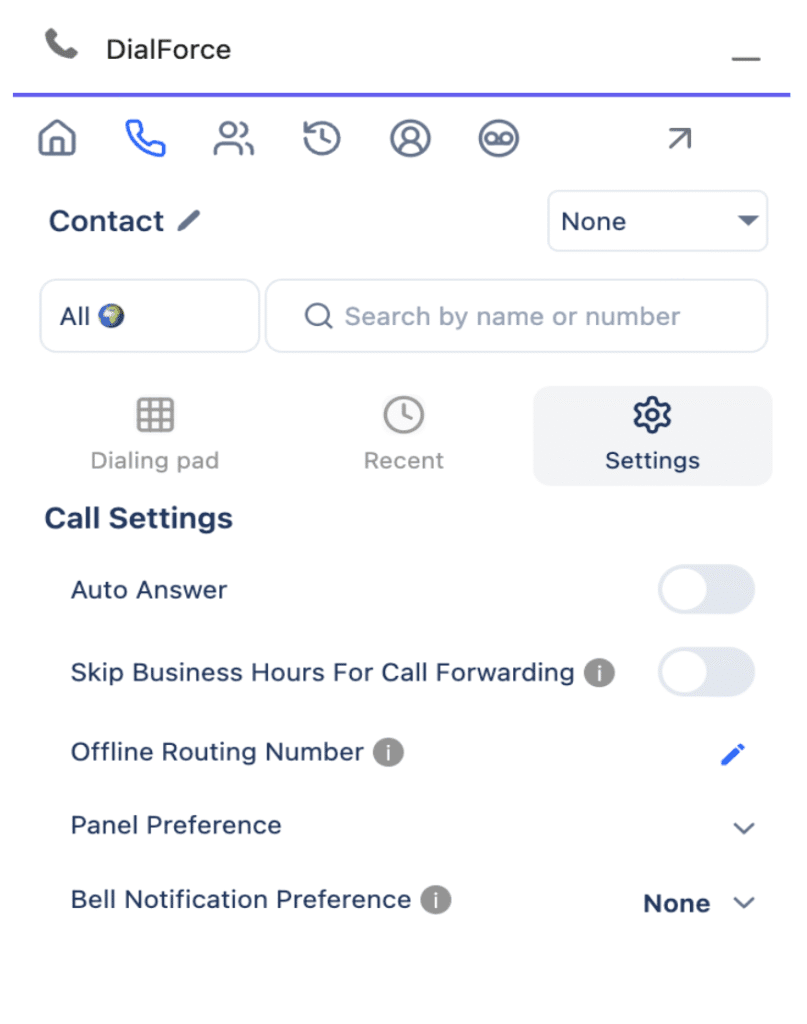
Call Settings #
Step 1: Auto Answer #
What it does:
Automatically answers incoming calls on your behalf.
When to use it:
Choose ON if you:
- Want calls to connect instantly without manual clicking.
- Handle a large volume of calls and prefer faster response time.
- Are part of an active call queue setup.
Keep it OFF if you:
- Prefer to manually pick which calls to answer.
- Need time to prepare before taking a call.
How to use:
- Find the Auto Answer toggle.
- Switch it ON to enable automatic answering.
- Switch it OFF to answer calls manually.
Tip: Make sure your headset or audio device is connected before enabling Auto Answer.
Step 2: Skip Business Hours for Call Forwarding #
What it does:
Allows your calls to be forwarded even outside your business hours.
When to use it:
Turn ON if you:
- Want to receive calls after office hours.
- Have a 24/7 support setup or are part of an on-call rotation.
Turn OFF if you:
- Only want calls to forward during standard business hours.
- Don’t want to be disturbed outside your schedule.
How to use:
- Locate the Skip Business Hours for Call Forwarding switch.
- Turn it ON or OFF based on your working hours preference.
Step 3: Offline Routing Number #
What it does:
Lets you define a phone number where calls will be routed when you are offline.
When to use it:
Use this feature if you:
- Want calls to reach your mobile number or another team when you’re not logged in.
- Have backup agents or voicemail systems outside of Salesforce.
Leave it empty if:
- You don’t want calls forwarded when offline.
How to use:
- Click the pencil icon next to the Offline Routing Number field.
- Enter the number where calls should be routed when you’re unavailable.
- Press Enter to save automatically.
Example: +1 555-123-4567 (Include country code)
Preferences #
Step 4: Panel Preference #
What it does:
Select which panel appears first when you open your CTI component.
Available options and when to use them:
| Option | When to Choose It |
| None | You don’t want any panel to open automatically. |
| Logs | You mainly monitor or review past call logs. |
| Conference | You frequently host or join conference calls. |
| Related List | You want to see records linked to calls by default. |
| Link Records | You often link calls to Salesforce records manually. |
| Tags | You organize calls with labels or tags. |
| SMS | You use text-based communication frequently. |
| Feedback | You gather feedback after each call. |
| Call Summary | You want to see a summary of recent calls first. |
| Bell Notification Preference | You want quick access to your notification settings. |
How to use:
- Click the Panel Preference dropdown.
- Choose your preferred section.
- Your choice saves automatically.
Step 5: Bell Notification Preference #
What it does:
Controls how you receive alerts for new calls or messages.
Available options and when to use them:
| Option | When to Choose It |
| None | You don’t want any notifications. Ideal for focused work or silent mode. |
| No Answer | Get notified only when a call isn’t answered. Good for supervisors tracking missed calls. |
| Busy | Get alerts when your line is busy. Perfect for monitoring active sessions. |
| Both | Get all alerts — ideal if you manage multiple calls or a team. |
How to use:
- Click the Bell Notification Preference dropdown.
- Select your preferred alert mode.
- The update saves automatically.
Tip: Choose None or Silent when in meetings or if you prefer no sound alerts.
That’s it!
All updates save automatically — no extra clicks needed!


